Secure your wordpress site (https) fast and free with Virtualmin and Let’s Encrypt
Google wants everything on the web to be travelling over a secure channel. That’s why in the future your Chrome browser will flag unencrypted websites as insecure, displaying a red “x” over a padlock in the URL bar.With this upcoming change in Chrome, Google makes it clear that the web of the future should all be encrypted, and all sites should be served over HTTPS, which is essentially a secure layer on top of the usual HTTP web protocol. In this post we are going to see how to secure your wordpress site (https) easily, fast and free by using Virtualmin web hostign control panel and Let’s encrypt free, aytomated and open certificate authority (CA). This procedure works for Joomla sites too.
Virtualmin
Virtualmin is a web hosting control panel, designed to make it easy to manage websites, mailbox users, databases, and web applications. It provides website owner accounts, easily installable web applications, file management, and a comprehensive and easy to use API for integration with billing and support systems. Installing Virtualmin provides a full-featured web hosting stack with web, email, databases, spam and antivirus filtering, analytics, and much more. Virtualmin is the easiest and fastest way to turn a Linux system into a full-featured web hosting system, and it is fully integrated with Webmin.
Let’s Encrypt
Let’s Encrypt is a free, automated, and open certificate authority (CA), run for the public’s benefit. It is a service provided by the Internet Security Research Group (ISRG).
They give people the digital certificates they need in order to enable HTTPS (SSL/TLS) for websites, for free, in the most user-friendly way we can. We do this because we want to create a more secure and privacy-respecting Web.
Step 1:
Login into webmin backend and in the virtualmin menu click on Edit Virtual Server –> Enabled features –>SSL website enabled
Step 2:
Go to Server configuration menu –> manage ssl certificate –> Lets encrypt –> Request certificate
Step 3:
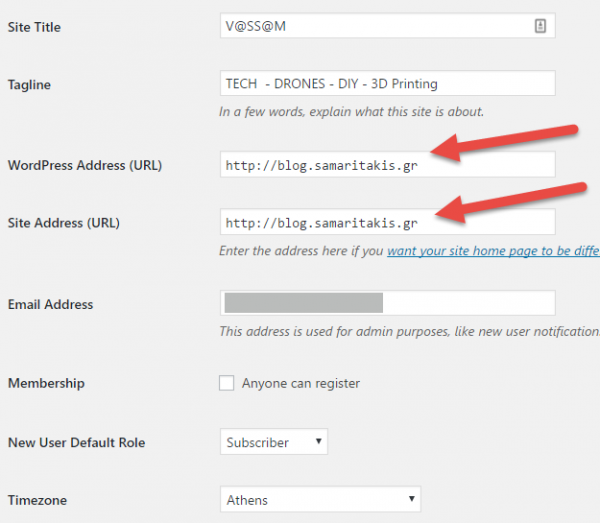
Login into wordpress backend –> Settings –> Genenal –> Change the URLs of WordPress Address and Site Address to https://yourdomain.com Step 4 :
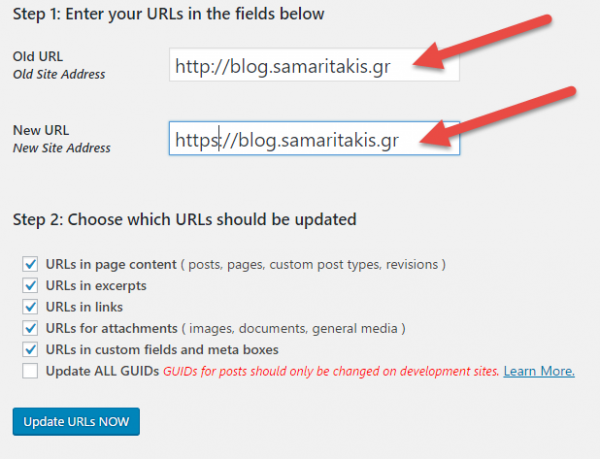
Download Velvet Blues Update URLs plugin to make yor links and references to point to your new domain name.
Step 5:
Check your homepage. If it has the Secure green lock you’ve done it. There is a possibility that your site will not be fully secured unless you change some links you’ve manually entered into the theme settings. So the best way to resolve this is to inpect your webpage to see which mixed resources your site use and fix it.

